Make A Rope Toy Square Knot Dogs
As some of you may already have seen on our social media posts, our puppy is much harder on his toys than our older boy ever was. I won't name any brand names here, but some VERY expensive heavy-duty dog toys have lasted for mere minutes in his happy little mouth. I am in no way a pioneer of fleece dog toys (there are many different DIYs out there). After a number of less than robust attempts, we finally made with a toy that both dogs enjoy and is able to survive for weeks of vigorous play, so we though we would try and share some simple visual instructions to help others who would like to try something similar.
П“ It has been a few years since we shared this post and now that Humphrey is a little less puppy-destructive and Oli a senior, these types of tug toys last for ages at our place, and wash/wear very well. They've also been tons of fun for Humphrey playing with other dog friends.The materials and craft supplies used in making the tug toy shown are:. Polar fleece fabric. ScissorsPolar fleece is sturdy (as fabrics go), has a nice touch of stretchiness when playing, and could be easily machine washed for a drool-refresh.
How to Make a Ball and Rope Dog Toy: After getting a puppy, I started making her dog toys out of rope. This toy has a long tail which is great for swinging it around to throw it for fetch, or for playing tug-a-war. At the dog park I had someone call it a 'fishing line for dogs'.
In less destructive hands (claws.fangs.), these would last much longer. The resulting tug was great for interactive play, the weaving prevented it from being rapidly unravelled as a braided toy might, and the strips were sizeable enough that any pieces that might be ripped off were readily retrieved for the rubbish (supervision required) and unlike typical fabric there are no errant threads. Again, I can't stress enough that supervision and interactivity is a must with this and any toy. Swallowing fabric (or anything else that's difficult to digest) is dangerous as it may lead to a blockage.This toy uses what was called a square knot waaayyy when we used to make bracelets and other woven trinkets as kids, as the the resulting woven object has square sides. It is also known as a box knot or an alternating crown sinnet.
To weave a basic tug toy, clean fabric is cut into 4 long narrow strips.You can scale the toy to suit your dog by altering the width and/or length of the fleece strips. In the toy shown, I worked with approximately 6-8cm x 2m strips (cut rather uneven.); however, you can make them larger/smaller to suit your dog and the size of fleece you have available. I've made many different shapes/sizes. There is also no need to be too fussy about straight lines when cutting if using scissors. Yay!. Loop and knot one end securely, leaving a 'tassel' at the end.
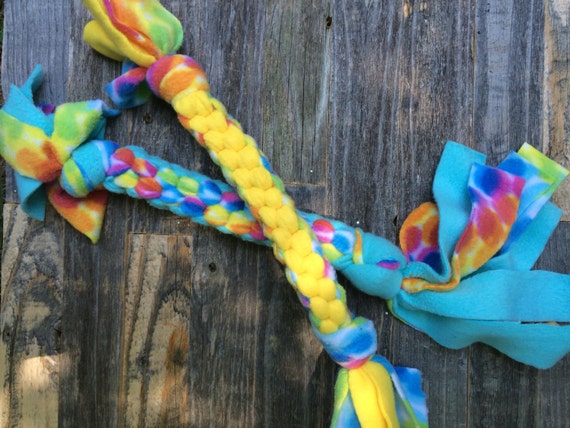
Weave the fleece using a square knot technique ( see diagram and images below):. Spread the stripsin a cross (+) shape. Fold the top strip towards the bottom.
Fold the bottomstrip towards the top. Fold the right strip towards the left, passing over then under. Fold the left strip towards the right, passing over then under. Pull to secure.
Repeat until you are approaching the end (not too close though - see tips below!). The top/bottom left/right pattern will cycle naturally from side-to-side with each knot. Loop and knot securely, leaving a 'tassel' at the end, and trim if/as needed.
Tips and tricks:. Once you get the hang of knotting, this is a very quick and simple toy to make, but knotting can be confusing if this is your first attempt. You may find it helpful to work with four different colours until you get the hang of things. As an added bonus, that also makes for a pretty result.
Keeping the working end of the tug stable/secure is key to getting a uniform pattern. If you rotate the working end or accidentally miss a loop or two along the way, it will show in the shape and/or colour pattern. Not to worry.your dog isn't judging on looks.
Just fun!. You can secure the starting/working end to something, if you wish, but personally I prefer to be seated with it nipped between my knees. This allows me to freely flip the strands to the front, back over a shoulder, and from side to side. Don't leave yourself short on the tie-off - you'll need more fabric than you might think!. Helpful information is also available in our Tug Toy FAQs, Tips, and Troubleshooting Mini-Series. Hello and welcome! Thanks so much for asking.
The simplest way to finish the working end is with a very basic 'simple' or 'overhand' knot (loop around self and pull end through until tight), which is how I finish most of my tug toys. Gather the ends together into a single bunch, loop around the bunch as close as you can to the end of your weave, pass the free ends through the loop, and pull tight.
This give you a nice tidy and secure wrap, and is also handy for hanging onto whilst playing. If you are doing a basic tug like this one, you also start with that knot, so it matches up nicely too.You can barely see the end in this toy poking out of Humphrey's mouth:) but the looped ends are visible in some of our other DIY toy photos in case that helps with a visual. It's up to you whether you would like to trim the ends or leave them loose - I often trim to even them out but leave a tantalising little bit of tassel for playtime.Hope that helps! Thanks for the lovely compliment!You can easily make the same style of woven toy with one (or more) loops that make great handles. Once you go past a single loop, you start to need very long pieces of fleece to make a decent sized toy for bigger dogs, so you might like to combine/join tugs to make bigger/fancier pieces without needing to buy a giant piece of material.Here is an example of our and you can find all of our tug-style toys with more ideas for making your own tugs. Hope that helps, and that you have fun making and playing with your new tug toys.:). By random chance, I saw a great question on a pin to this post on someone else's Pinterest asking about fleece and dog safety.
I though I would share a few thoughts here (and invite you to add in the replies if you have useful links for us and our readers).Ultimately, you have to make the decision as to what you feel is suitable for you and your pets. This blog is intended for info/entertainment (i.e. Sharing my fun!) only, not for any professional expertise of guidance.Unfortunately, all materials (and toys, bought or made) seem to have pros and cons. Fleece is durable, colourfast, and doesn't shed threads like woven fabrics, but it is a synthetic material. Given it's current widespread usage, including many items for babies and children, there is a lot of information available on material safety if you're keen to Google. There are also some interesting articles on it's environmental pros and cons for those interested. You can, of course, adapt any doggy DIY (from here or anywhere) into another material that you feel comfortable with using and feel is appropriate for your pet.Of course, any toy no matter what it's made of or where it's sourced from also requires dog-by-dog consideration for suitability and supervision during play.If you looking for dog safety information, you might like to check out the Humane Society's guidance.
Safety Bee's post is a very good read as well. Personally, it only takes me around 5 minutes to make a basic box knot tug (extra for fancier designs of course); however, I have plenty of experience with making these types of toys and other crafting.
If it was your first attempt at a basic average sized single straight tug tug toy, it world probably take you around half an hour. Less if you're crafty, more if your a newbie or a perfectionist.:) It isn't difficult, but it can feel that way at first. With a little experience, the weaving become a natural rhythm and toys come together VERY quickly.You can absolutely use a single colour if you'd like (and it's a good way to hid any little boo-boos in your first weaving attempt - bonus!) It can be a little tricky to remember which strand is going where when you're just starting, which is why I used four colours in the diagram and suggested it may help if you're new to weaving. Good luck, and don't forget to play safe. Thanks for asking - I'll try to help if I can.:)If you are weaving the box knot with a consistent left/right up/down, it will be squarish and in a line, like the pictures for this toy and many of our other tugs. If things are twisting a little (i.e.
The strand or the working end of your toy are moving around a little), then that twist gets captured in the weave, which sounds like what you might be experiencing from the description of colour and roundness.Take a peak at our post describing the and you can see a side by side picture of of a square tug and a rounded twist tug. The twist effect applied consistently can be used to create a uniform scatter pattern of colours or a diagonal stripe effect.In my personal experience with weaving, the key to getting a consistent pattern, whether it's straight square or twist or other variations, is to keep the working end of your tug securely fixed. I like to work seated in a chair and nip mine between my knees - not fancy, but very effective.:) This allows me to keep my working end fixed while I weave and also gives me space to freely flip the strands to the front/back over a shoulder and outwards from side to side.Hope that helps and good luck with your toys! That's a deceptively tricky question as how long (and wide) your toy will be for a length/width of strips can vary quite a bit depending on both the weight of fleece you use and how tight you make each knot.The measurements above should work nicely for you to make a toy in that size range or bigger. As you can see from the picture with Humphrey, his toy is nice and long (and quite a bit longer when stretched during play).Depending on what you're making the toy out of, if you're buying fleece to weave with you might find it easy and economical to use it at the fabric's natural width. Most shops are happy to cut and sell relatively small lengths (at least they are here!), so you can get a little starter stash of fleece without having to buy the for length.
For example, here, the common widths on rolls of cut-to-measure fleece vary from around 110cm to 220cm, which means you can buy a short length of fleece and cut it into long strips using the natural width. I hope that make sense.:)Good luck and have fun! :) Pawesome, Sarah! Thanks for taking the time to share your tip with us and our readers - very helpful.I usually turn to fleece for strength, but also works well, if the sizes are right. Hubby's tatty old shirts are perfect for this when I'm salvaging the 'good bits' for other uses.:) I find that the hems are extra tough compared to the cotton in the body of the shirt. I've never had much joy with the latter, but haven't used stretchy cotton so may try with your tips if I have scrap material in the future.
Hi Setkat!:) The measurements for the pictured toy are in the italic notes at the start of the instructions, but size is at your discretion so that you can scale the toy to suit your dog by altering the width and/or length of the fleece strips.In the toy shown, I worked with approximately 5-6cm wide x 2m long strips. I wanted a 'fat' tug toy for play but also large thick strips for the post pictures. I often use narrower strips and sometimes double (pair eight strips into four sets of two) to get a super thick tug without super thick strips which can start to get cumbersome for tidy weaving as you go wider.You can make them larger/smaller to suit your dog and the size of fleece you have available. I've made many different shapes/sizes.
There is also no need to be too fussy about straight lines when cutting if using scissors. Yay!Hope that helps!:).
How long our toys last with our boys varies a lot depending on how popular the toy is in the toy box rotation (Humphrey has favourites), how robust it is, the vigor of play, and whether it has a squeaker (always a finite lifespan for stuffed toys). When Humphrey was a pup and Oli was also more playful, they were very rough indeed but now (3 and 11), a toy like this can last a very long time at our place. We have tugs in the toybox that are over a year old and still going strong. So good!I do routine first aid on the boys toys if/as required when I notice damage/wear during play and do a regular sweep of the full toybox when I wash/clean all of their toys (reknotting, trimming ends, etc). I also keep a basket for repair and salvage.I clean on an ad-hoc basis when needed if things look grubby or someone has been ill.
If they haven't been cleaned in a while, I do it maybe every couple of weeks when the weather cooperates. I should probably do it more for some!:) We don't use food/treat toys (competition problem with the current age/energy gap), but when we did those were washed after every use.As shared in our, depending on the toy, this may involve simple laundry (soft/plush toys or fabric tug toys, use a sweater/lingerie sack if needed for smaller items), a cycle through dishwasher (solid toys of dishwasher safe materials), or handwashing (complex shapes that are best scrubbed, squeakers to avoid filling with water). Be careful with your choice of cleaning products as they may linger on/in the toys leaving nasty chemicals, scents your dog dislikes, or icky tastes. Skip the chemicals or use something non-toxic and make sure it is thoroughly rinsed away before drying. If needed, I do a double wash with cleaners and then a re-wash with either plain water or add in baking soda/vinegar.Hope that helps!:). We had a reader question by email about what happens after the first layer and I thought I would share part of my email reply here as it may be helpful to other people getting used to the weaving technique for the first time:For each layer of a four-strand square weave, the steps are exactly the same. The vertical (top/bottom) strips stay vertical and the horizontal (left/right) strips stay horizontal, they just flip flop their + positions relative to the center of your tug each time: top becomes bottom, left becomes right every time.
During this movement, each strip creates a single loop over and tuck under the perpendicular pair. Each passing of the strips over (creates the visible 'bumps' of the tug) and under (and in doing so securing them in place) as they move back and forth in this flip flop creates a layer in your tug toy.In the pictures/diagram in the post, my verticals are grey and white and my horizontals are black and red. In the diagram:- grey is at the top, folds down to the bottom- white is at the bottom, folds up to the top- red is on the right, folds to the left, passing over the folded white strip and under the folded grey strip- black is on the left, folds to the right, passing over the folded grey strip and under the folded white strip.When the ends tighten, the four loops pull tight and secure the strips in their new position leaving a 'bump' at each over.
This creates a layer in the tug. The pairs strips have all swapped position to the opposite side of the tug, with grey at the bottom, white at the top and red on the left, black on the right (would look like the positions in the collaged photographs). The next layer of the weave is exactly the same process, just with the opposite directions for each colour as they move back:- white is at the top, folds down to the bottom- grey is at the bottom, folds up to the top- black is on the right, folds to the left, passing over the folded grey strip and under the folded white strip- red is on the left, folds to the right, passing over the folded white strip and under the folded grey strip.The strips are now back in the same position as the diagram. The up/down left/right cycle continues for each layer you create. What's safe will vary greatly depending on the individual dog and their style of play. Check out the humane society link noted in the toy safety comment in the post for some handy information on toy selection and safety.We don't recommend toys, we just share what we do ourselves for interest. No matter what the toy, bought or homemade, we do recommend playing together.
It's always safer (and way more fun!), and it is particularly important is you are getting to know a new dog. What's fun for one may be dangerous for another.You're also right that one dog's favourite toy might not interest another dog at all, or they may approach it totally differently. I'm sure you and your pup will get to know what works well for you as you get used to life together.
Have fun and play safe!:).
Tug toys can be great fun and many dogs really enjoy the interaction of tugging with you.Unfortunately, though, many commercial tug toys are made only for medium to large dogs and are of materials that can often be hard on your dog’s teeth. Fleece toys, however, can be made for any size dog and are soft.
Plus, the friction of the cloth against your dog’s teeth can help keep the teeth cleaner. The fleece won’t remove tartar but it will remove food bits.You can purchase commercially made fleece tug toys but they’re also easy to make.
Plus, by making the toy yourself, you can make it to the size you and your dog prefer. Three 4-inch-wide pieces of fleece, cut long-ways. Stick tennis 2 player games. The FleeceYou can find fleece material in just about any fabric store. It can be found in lighter and heavier weights; I’d suggest for your first time making a tug toy, chose a light to medium weight fleece as it’s easier to work with. Later, with some experience, if you’d like a heavier toy for a larger dog, you can then try it with a heavier fleece.Any color or color pattern will work. Some people make patterns but that’s totally up to you. In fact, if you check the remnant basket in the store, you’ll often find marked down remnants, sometimes in some interesting colors.For this toy, you’ll need one-third of a yard of standard width as it’s found on the bolt.
After clamping the material to the table or counter, braid the right side creating half of the handle. Use a rubber band to keep it from unrolling. Making the HandleCut the material into three 4-inch strips of material the full length of the cloth—generally about 60 inches. This means you’re cutting it the long way. Three 4-inch strips equals 12 inches or one-third of a yard.Hold all three strips so the ends are even. Fold in half so you find the middle of the length.
Using a large clamp, clamp the middle of the strips to a table, counter or work bench. This is to hold the middle securely so you can braid tightly and with some tension.Starting on the right side of the clamp, braid the strips, making a snug, tight braid for 4 to 6 inches. This is half of the handle so braid 4 inches for a smaller handle, 6 for a larger one. Use a rubber band to keep this section from coming undone once you’re finished.Before repeating this on the left side, move the clamp to the right of center to a section already braided. Then as you begin braiding, you’re doing so right up against the beginning of the right side. Again, do 4 to 6 inches.Remove the rubber band from the right side and pull both sides together; this is the handle.
After finishing the first side of the handle, move the clamp over onto the braided section and braid the second half of the handle. Making the TugWith three strips from each side of the handle, you now have six strips to braid. Match strips from the right side to strips from the left.
Braid snugly and tightly, as you did in the handle, as any loose strips will be weak points the dog could pull on while you’re playing.When you’re about three inches from the end of the strips, stop braiding and tie a tight knot in the end. Make sure it’s tight as again, loose strips are weak points. You can leave the loose ends or trim them to the knot; it’s your choice. After finishing the handle, using all six pieces, two at a time, braid the length of the tug toy. Stop before reaching the very end as you need enough to tie a sturdy knot. For Larger DogsFor larger dogs, you have several different options. You can get half a yard of fleece and cut six 3-inch wide strips.
This would give you six narrower strips in the handle but twelve strips in the tug portion of the toy. It will be thicker braiding but will also create a thicker toy.You can also stay with three strips, as we had for the first toy, but make the strips wider. For example, you could use 1/2 yard of material and cut three six inch wide strips.
For these, as you work with them, roll them slightly so they are easier to handle while braiding.If you feel confident, you can also make a toy with a heavier weight fleece. With this fleece, you can make the original toy, or either one of these options. For Smaller DogsIt’s easy to scale down for smaller dogs.
Just cut the strips at two to three inches wide, depending on your dog. I suggest two inches for a toy breed dog and three inches wide for a small dog. Braid as we did for the first toy. You’ll end up with a toy with the same handle and the same length but significantly narrower so small mouths can grab it. After tying the knot, trim the loose pieces to about three inches or so, if you need to, and voila!
To Create a Longer TugIf you’d like a longer tug toy, buy two-thirds of a yard of fleece and instead of cutting three 4-inch wide strips, cut six. Make the handle as we did in the first tug, then begin braiding the tug part of the toy. At varied parts of the toy, take a second piece of tug and tie a new section on to one strip with a small tight knot. Don’t wait until the end and tie all three new strips on at the same time; that makes an ungainly mess.
Instead, a third of the way down, tie on a strip and cut off the excess of the first strip. Two-thirds of the way down, repeat with the second strip, and so on.
When one of the strips begins to get short, tie on the leftover remnant from the first strip. Continue until all of the material has been used and you’re about three inches from the end. Knot it tightly. Fleece is WashableI wash my dog’s tug toys with old blankets or towels and if the knots are small and tight, they wash without coming apart. However, not all fleece is colorfast so test the toy first or wash it with something that isn’t important.
I dry the toys by hanging them up to dry.With care, these toys will last a long time. Meet the Author:Liz Palika is a Certified Dog Trainer and Certified Animal Behavior Consultant as well as the founder and co-owner of Kindred Spirits Dog Training in northern San Diego county. Liz is also the founder of Love on a Leash therapy dogs; her dog, Bones, goes on visits on a regular basis.
A prolific writer, Liz is also the author of more than 80 books. Many of her works have been nominated or won awards from a variety of organizations, including Dog Writers Association of America, San Diego Book Awards, the ASPCA, and others. Liz shares her home with three English Shepherds: Bones, Hero, and Seven, as well as one confident and bossy orange tabby cat, Kirk. To relax from work, or to take work on the road, Liz and her crew travel the West and PNW in their RV.
If you see an RV on the road named 'Travelin' Dogs', honk and say hi!